The darkroom is where the exposed film is developed. It must be dark to eliminate any chance of outside light ruining the exposed film. In black and white film developing, a low-intensity red or amber colored lamp called a safe light is used so the photographer can see their way around during developing. The light emitted from the lamp is of a wavelength that does not affect exposure results.

Photograph of a body of water with ‘dodge’ and ‘burn’ text overlaid in order to give an example of the two effects.
Most darkrooms include an enlarger, an instrument with a lens and aperture in it that projects the image from a negative onto a base. Photographic paper is then placed under the projected image and exposed to light. The paper is put into a series of solutions that progressively start and stop the development of the positive photographic image. The development process gives the photographer another opportunity to manipulate the original image. Specific areas on the print can be exposed to more light (“burning” or darkening areas) or less light (“dodging” or lightening areas) in order to bring up details or create more dramatic visual effects. The image can also be cropped from its original size depending on how the photographer wants to present the final image.
Light meters are used to calibrate the amount of light available for a certain exposure. The photographer adjusts the aperture of the camera to allow for more or less light to fall on the film during the initial exposure. But light meters alone don’t guarantee the perfect photograph because they indicate the total amount of light, without respect to specific areas of light or dark within the format of the picture.

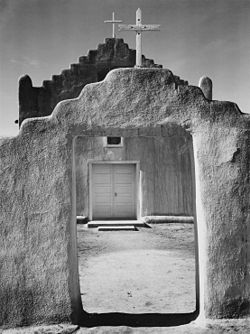
Ansel Adams, Taos Pueblo, 1942. Black and white photograph. Collection of the National Archives, Washington, D.C.
For this, the photographers Ansel Adams and Fred Archer created the zone system. The system relies on two interrelated factors – the visualization of how the photographer wants the print to look even before they take it, and a correct light calibration from all the areas by assigning numbers to different brightness values – or ‘zones’ on the value scale, from white to black and all the various gray tones in between. The zone system is tedious both in the field and in the darkroom, but, since its inception in 1940, has spurred creation of photographs absolutely stunning in their clarity, composition and graphic drama. Adams’ Taos Pueblo is an example.
Introduction
The camera’s ability to capture a moment in time is not without difficulties. We’ve all had the experience where we declare “If I only had a camera with me!” On one hand, photographs taken in the studio are controlled productions, with the photographer working to find balances with lighting and composition. On the other hand, straight outdoor photography is unpredictable. Lighting and weather conditions change quickly, and so do the locations where the photographer will find that “one great shot”. To compensate for these variables, photographers typically take hundreds of pictures, bracketing shutter speeds and aperture settings as they go, then carefully editing each negative and print until they find the handful, or perhaps only the one, that will be the best image of them all.
The Darkroom
The darkroom is where the exposed film is developed. It must be dark to eliminate any chance of outside light ruining the exposed film. In black and white film developing, a low-intensity red or amber colored lamp called a safe light is used so the photographer can see their way around during developing. The light emitted from the lamp is of a wavelength that does not affect exposure results.
Most darkrooms include an enlarger, an instrument with a lens and aperture in it that projects the image from a negative onto a base. Photographic paper is then placed under the projected image and exposed to light. The paper is put into a series of solutions that progressively start and stop the development of the positive photographic image. The development process gives the photographer another opportunity to manipulate the original image. Specific areas on the print can be exposed to more light (“burning” or darkening areas) or less light (“dodging” or lightening areas) in order to bring up details or create more dramatic visual effects. The image can also be cropped from its original size depending on how the photographer wants to present the final image.
Light meters are used to calibrate the amount of light available for a certain exposure. The photographer adjusts the aperture of the camera to allow for more or less light to fall on the film during the initial exposure. But light meters alone don’t guarantee the perfect photograph because they indicate the total amount of light, without respect to specific areas of light or dark within the format of the picture.
For this, the photographers Ansel Adams and Fred Archer created the zone system. The system relies on two interrelated factors – the visualization of how the photographer wants the print to look even before they take it, and a correct light calibration from all the areas by assigning numbers to different brightness values – or ‘zones’ on the value scale, from white to black and all the various gray tones in between. The zone system is tedious both in the field and in the darkroom, but, since its inception in 1940, has spurred creation of photographs absolutely stunning in their clarity, composition and graphic drama. Adams’ Taos Pueblo is an example.
Content is available under the
Creative Commons Attribution Share Alike License.
Privacy Policy | Authors